
Setting Up SSO
Admin of a HelpDesk account can configure SSO by signing in to a central identity provider. To set up a SSO, the admin needs to:
Configure identity provider
HelpDesk supports login via credentials created using Standard Assertion Markup Language (SAML) 2.0. For implementing SAML authentication, SAML URLs and Certificate are needed, which can be obtained from any supported IdP.
Once an admin registers with an IdP of their choice, they will receive the following:
- IdP Issuer URL This URL uniquely identifies the application for which single sign-on is being configured.
- Single Sign-On URL This URL processes an authentication request from the technician's browser and returns an authentication response to verify the technician.
- X.509 certificate (Base64) An X.509 certificate is a security certificate that you receive from your identity provider to verify your identity. It comes in different formats, but HelpDesk only accepts .pem or .cer format.
Configure HelpDesk account
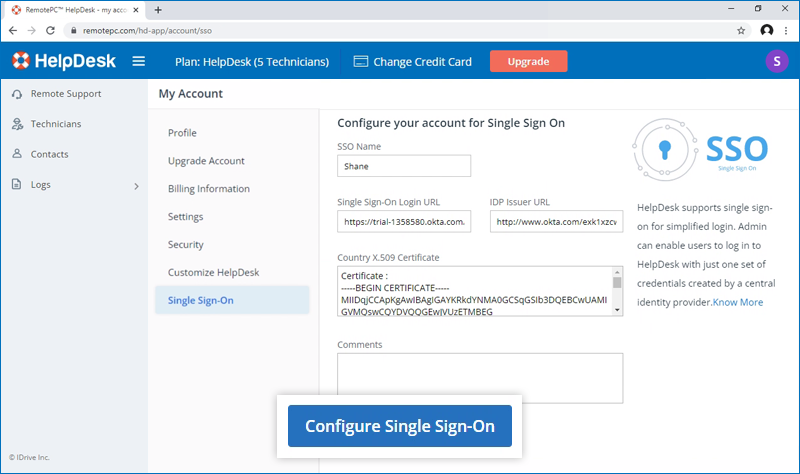
Admin needs to provide the received SAML URLs and Certificate in the Single Sign-On application from the HelpDesk web interface.
To configure SSO,
- Login to HelpDesk account via web browser.
- Klicken Sie auf den oben rechts angezeigten Benutzernamen und dann auf "Mein Konto".
- Klicken Sie auf 'Single Sign-On'.
- Geben Sie einen Namen für Ihr SSO-Profil ein.
- Geben Sie die URLs ein und fügen Sie das von Ihrem IdP erhaltene X.509-Zertifikat hinzu.
Hinweis: X.509-Zertifikate sollten nur im .pem- oder .cer-Format vorliegen. - Klicken Sie auf 'Single Sign-On konfigurieren'.
Sie erhalten eine E-Mail, wenn SSO aktiviert ist.
