Access via Desktop
RemotePC HelpDesk equips organizations with uninterrupted remote support to address queries of the customers. With HelpDesk, you can enable your technicians to remotely connect to customers' PCs / Macs; thereby offering real-time support.
HelpDesk can be set up easily, offers a simple user interface and integrates seamlessly with your existing workflow.
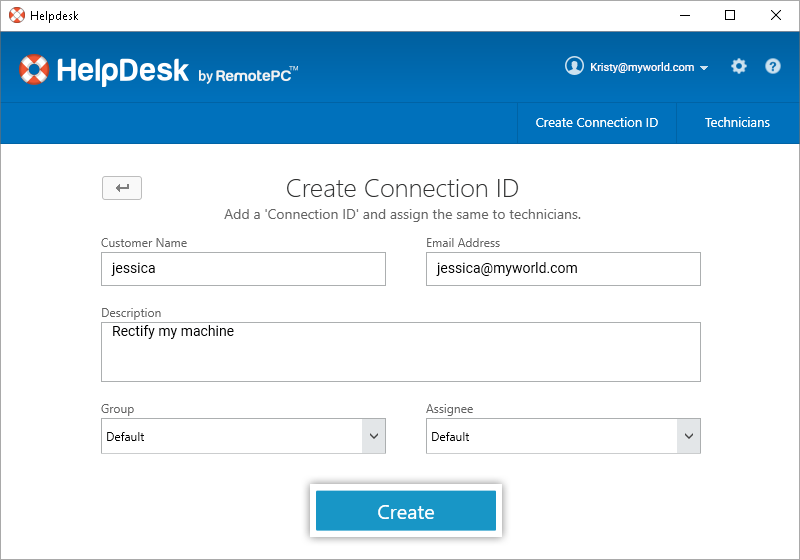
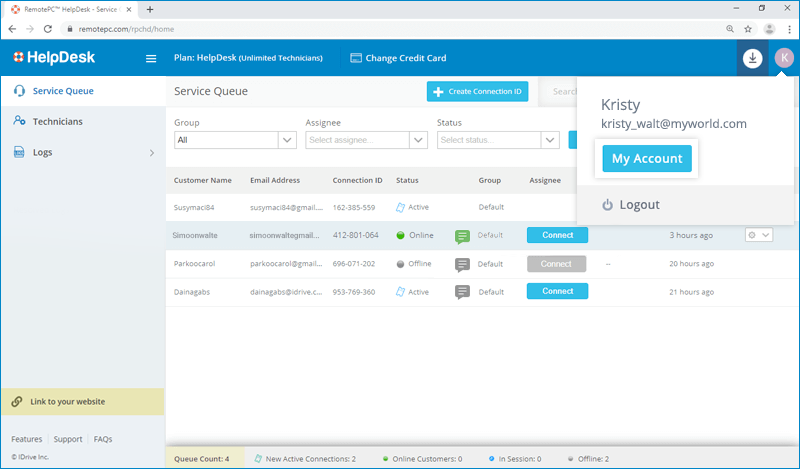
A 'Connection ID' is a service request that can be created by the admin of a HelpDesk account or a technician. It provides details such as customer name and email address, as well as the name of the technician to whom it is assigned.
To create a 'Connection ID',
- Launch the HelpDesk application and log in.
-
In the 'Create Connection ID' tab, enter customer details and select the assignee.
-
Click 'Create'. The 'Connection ID Generated' screen appears.
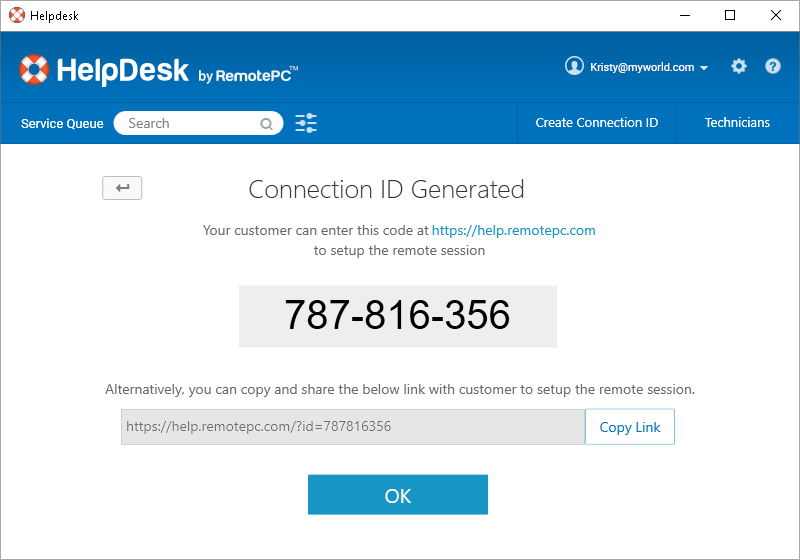
- Share the code with the customer. They need to go to https://help.remotepc.com and enter the shared code.
All created Connection IDs are listed in the 'Service Queue' tab of the HelpDesk application.
While creating a Connection ID, you can allocate the same to a technician. You can also edit / modify a Connection ID or re-assign it to another technician.
To allocate / modify a Connection ID,
- Launch the HelpDesk application and log in.
-
In the 'Service Queue' tab, click
 corresponding to the Connection ID and select 'Edit' from the drop down list.
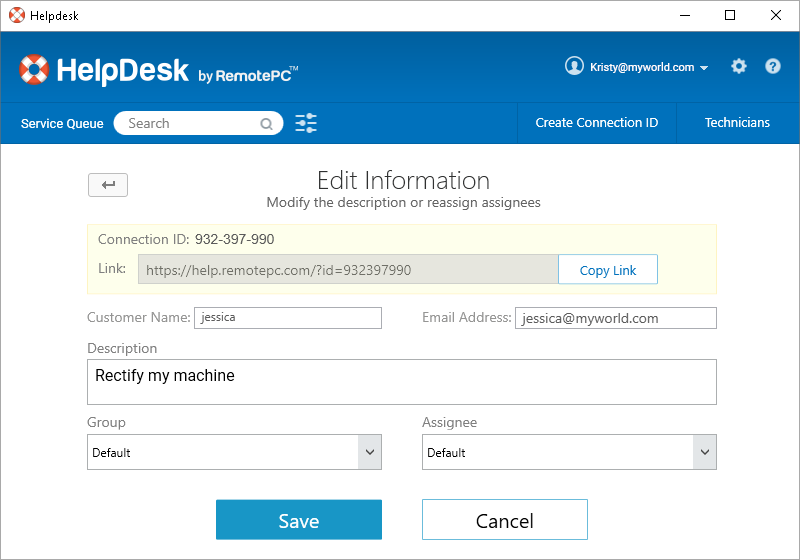
- In the 'Edit Information' window, select the 'Group' and 'Assignee'.
- Klicken Sie auf "Speichern".
To view the status of Connection ID,
- Launch the HelpDesk application and log in.
- Click .
- Select the respective 'Group', 'Assignee' or 'Status'.
- Click 'View'. The respective Connection IDs will appear.
Once this is completed, the respective Connection IDs will be displayed. You can filter them based on the group, assignee and status of the Connection ID.
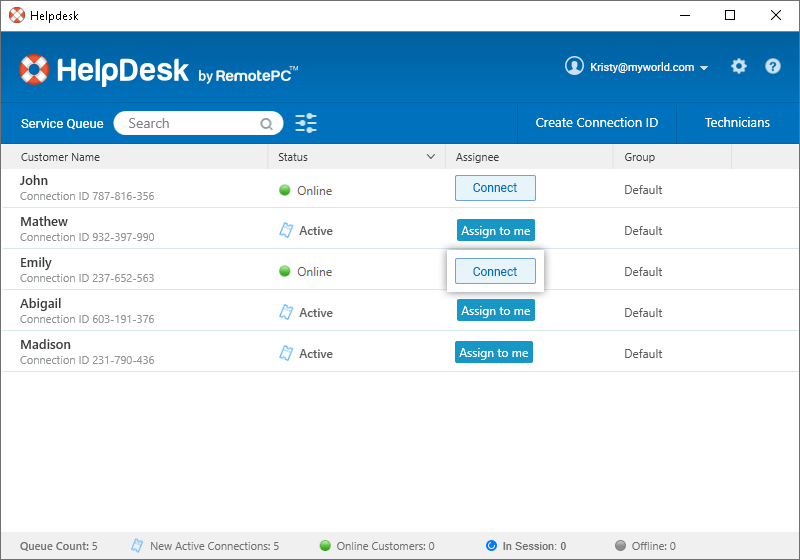
To begin working on a Connection ID,
- Launch the HelpDesk application and log in.
-
Go to the 'Service Queue' tab and click 'Connect' against a particular Connection ID to access the customer's computer remotely.
Note: The 'Connect' button is visible to the technician only when the customer installs the setup.
Yes, you can work on a Connection ID that has not yet been assigned to anyone. The list of all Connection IDs are displayed in the 'Service Queue' tab.
To self-assign a Connection ID,
- Launch the HelpDesk application and log in.
- In the 'Service Queue' tab, click 'Assign to me' corresponding to the Connection ID you want to work on.
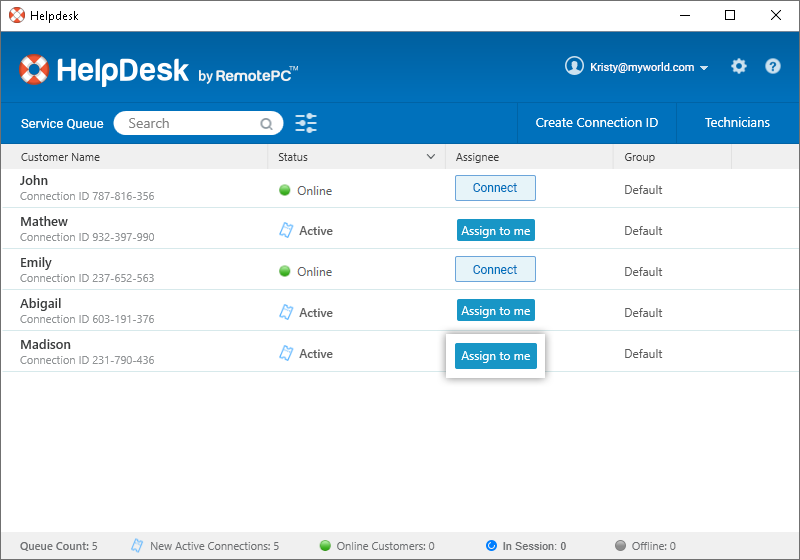
Once this is completed, the Connection ID will be assigned to you.
Zum Bearbeiten,
- Launch the HelpDesk application and log in.
- On the 'Service Queue' tab, click corresponding to the Connection ID and select 'Edit' from the drop down list.
- Modify the Connection ID details as needed.
-
Klicken Sie auf "Speichern".
Note: Technicians can edit Connection IDs assigned to them or to their group only.
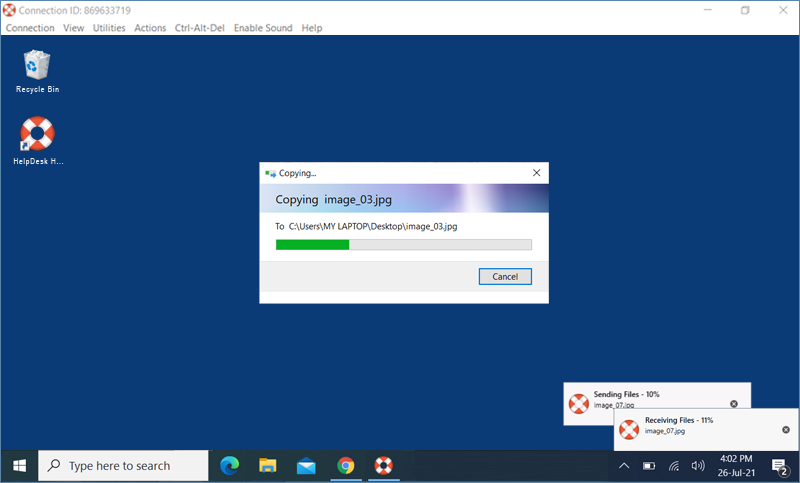
To move files / folders between your local computer and remote computer,
- Launch the HelpDesk application and log in.
- In the 'Service Queue' tab, click 'Connect' against a Connection ID and establish connection.
- Go to the 'Utilities' tab in the menu bar and click 'File Transfer'.
- Select the files from your computer and choose the location for file transfer.
- Klicken Sie auf
 .
.
Note: You can easily move files back to the original destination when needed.
Yes, you can record and save a remote support session for future reference.
To record a session,
- Launch the HelpDesk application and log in.
- In the 'Service Queue' tab, click 'Connect' against a Connection ID and establish connection.
-
Go to the 'Utilities' tab in the menu bar and click 'Record Now!'.
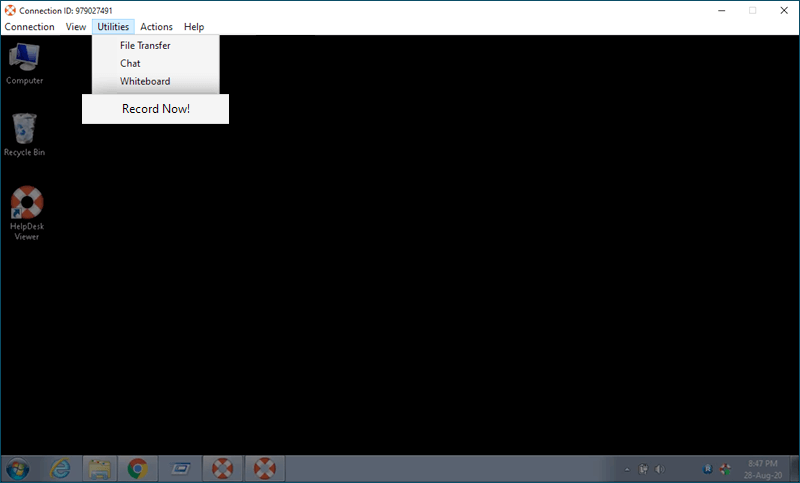
- Click 'Stop Recording' to end recording the session and save it. Else the recording will be saved automatically once the session ends.
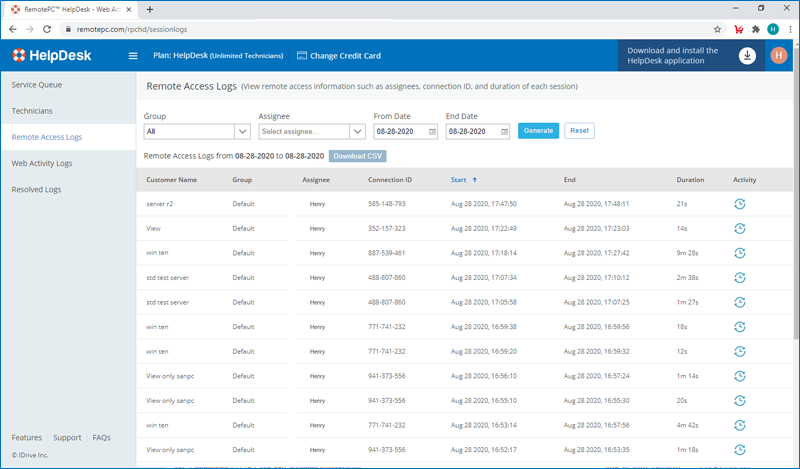
All saved recordings can be viewed from the 'Remote Access Logs' section of the HelpDesk web console.
Yes, HelpDesk is compatible with Windows UAC (User Account Control). If a customer has installed the HelpDesk application in standard mode on their Windows computer, you need to login to the customer's computer with Windows Admin credentials to control the UAC on the computer.
To connect using Windows Authentication,
- Launch the HelpDesk application and log in.
-
Go to the 'Service Queue' tab. Click the dropdown against a particular Connection ID and select 'Send Credentials'.
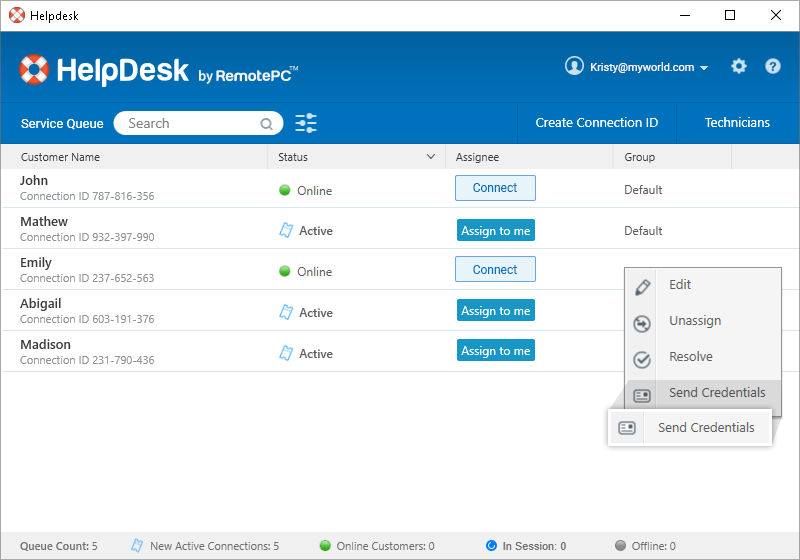
-
The HelpDesk authentication window will appear. Enter the Windows (Admin) login, and the Windows password, as provided by the customer, and click 'OK'.
Note: The customer must allow permission when prompted.
Once done, click the 'Connect' button against the Connection ID to access the customer's computer remotely.
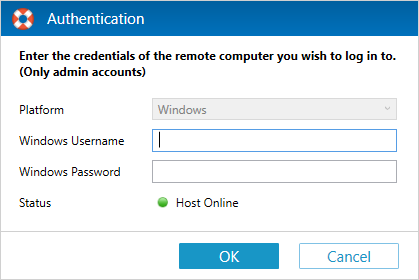
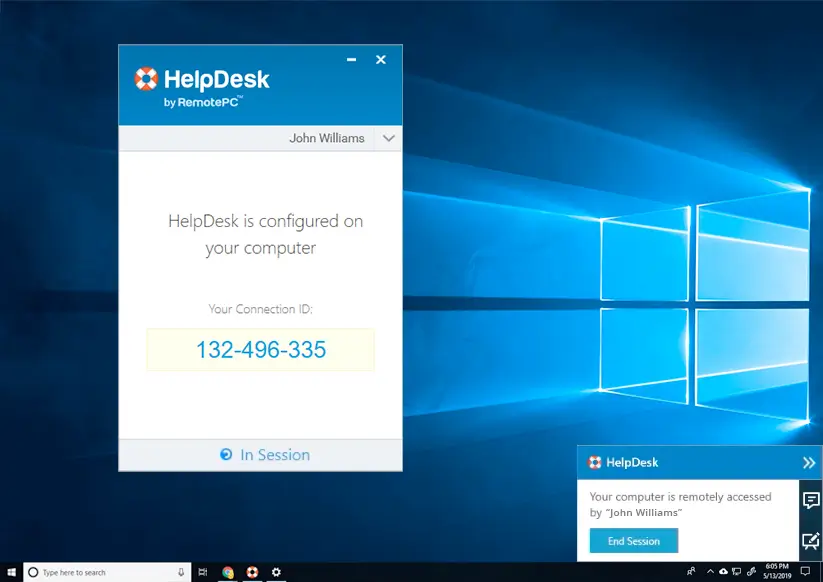
Once a Connection ID is created, you will receive a link or a 9-digit code from the technician.
-
Gehe zu https://help.remotepc.com, and enter the shared code.
For a Windows system this will download a .exe file and for Mac it will download a .dmg file.
- Install the .exe / .dmg file.
-
On installation completion, the HelpDesk application will auto-launch and display the status as 'Ready to connect'. The technician will then be able to access your computer remotely to provide support.

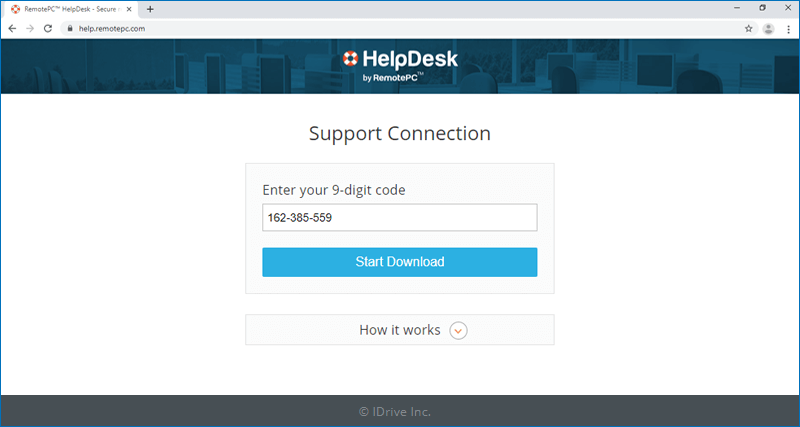
HelpDesk is a minimal UI application with options to manage proxy settings, send error report, and check the version. The main window displays the Connection ID and / or the status of your remote session.
To modify proxy settings,
- Click the name on the main window and select 'Proxy Settings'.
- Update the required settings and click 'OK'.
To send error report,
- Click the name on the main window and select 'Send Error Report'.
- Enter your query, or describe the issue and click 'Send'.
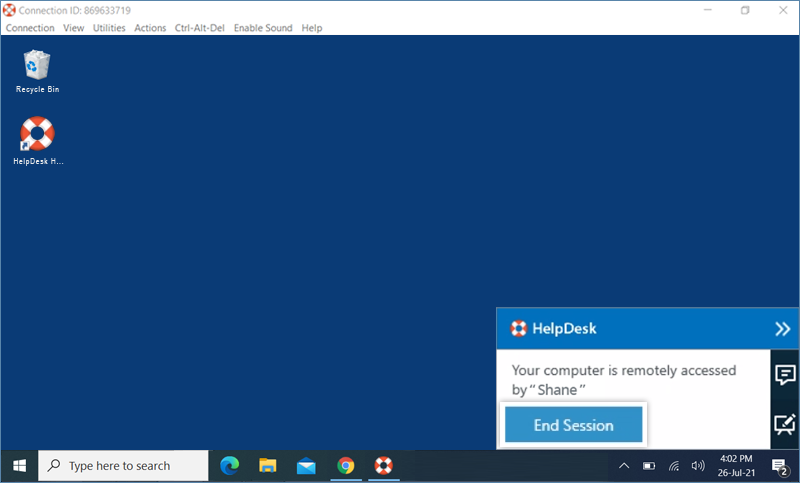
Yes, you can disable remote access during a remote session by clicking the 'End Session' button in the desktop notification.
What should I do if the remote access seems suspicious or an unauthorised party is trying to access my computer?
Remote sessions via HelpDesk are very secure. However, if the remote access seems suspicious, you can uninstall the setup at any point of time. Simply click the 'End Session' button in the desktop notification. This will resolve the ticket and unistall the HelpDesk application.
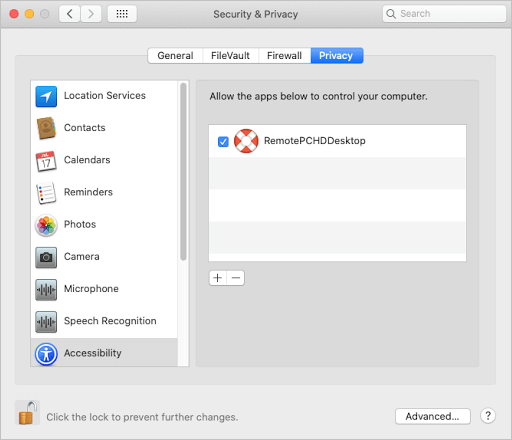
Mac OS Catalina requires user permission for applications to access privacy sensitive data. Hence you need to grant accessibility permissions to HelpDesk.
To authorize Helpdesk,
- Öffnen Sie die Systemeinstellungen und gehen Sie zum Bereich "Sicherheit und Datenschutz".
- Select 'Accessibility'.
- Klicken Sie auf
 und bieten eine Systemauthentifizierung, um Änderungen zu ermöglichen.
 - Select the checkbox next to 'RemotePCHDDesktop'.
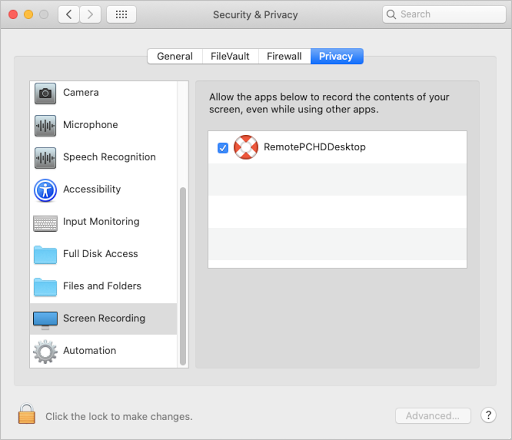
To record screen content, the Mac OS Catalina requires user permission for applications, even while using other apps. Hence you need to grant screen recording permissions to HelpDesk.
To authorize HelpDesk,
- Öffnen Sie die Systemeinstellungen und gehen Sie zum Bereich "Sicherheit und Datenschutz".
- Wählen Sie "Bildschirmaufnahme".
- Klicken Sie auf und bieten eine Systemauthentifizierung, um Änderungen zu ermöglichen.
- Select the checkbox next to 'RemotePCHDDesktop'
Yes, RemotePC™ HelpDesk can be integrated into four popular support platforms namely Zendesk Support, Freshdesk Support, Freshservice Support, and ServiceNow Support. The HelpDesk integration enables your technicians to initiate a remote support session and access your customer’s computer remotely from within these support platforms to deliver timely on-demand remote assistance.
-
Get the RemotePC HelpDesk app for free in the Zendesk Marketplace
-
Get the RemotePC HelpDesk app for free in the Freshdesk Marketplace
-
Get the RemotePC HelpDesk app for free in the Freshservice Marketplace
-
Get the RemotePC HelpDesk app for free in the ServiceNow Store
Note: Download and run the HelpDesk app launcher on your computer to connect to your customer's computer via the RemotePC HelpDesk app from the preferred Support Platform.
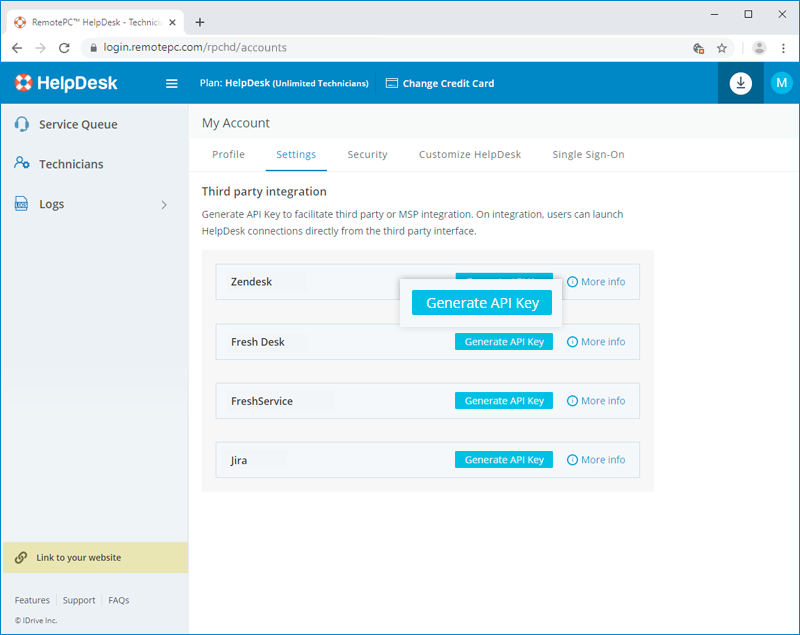
To generate an API Key,
- Launch the HelpDesk application and log in.
-
Klicken Sie auf den oben rechts angezeigten Benutzernamen und dann auf "Mein Konto".
- Go to 'Settings' > 'Third party integration'.
-
Click 'Generate API Key'. It will generate an API key.
-
Copy the key to facilitate third party or MSP integration.
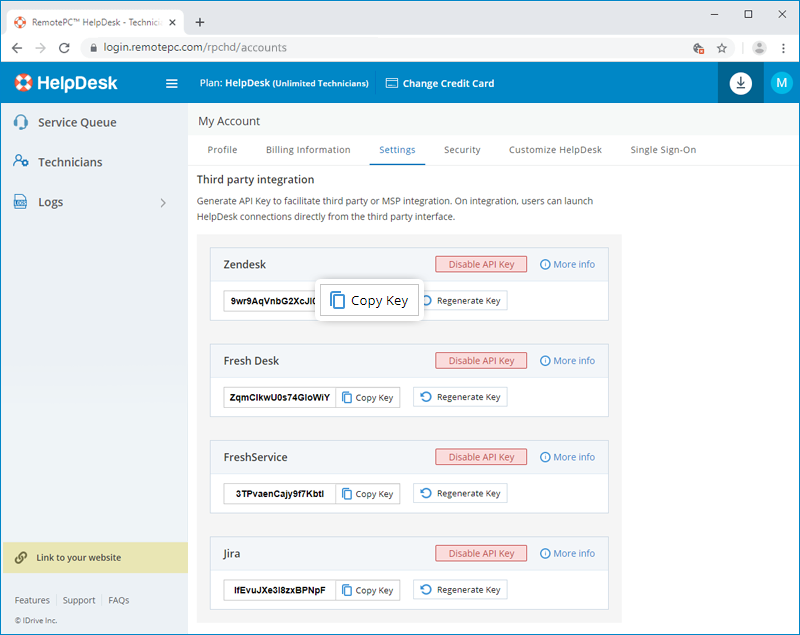
On integration, users can launch HelpDesk connections directly from the third party interface.
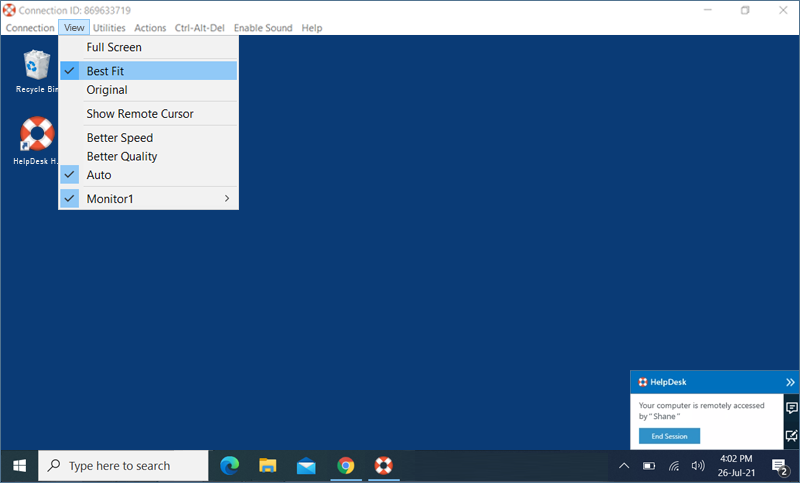
Kann ich den Desktop des Ferncomputers so skalieren, dass er in das Fenster meines lokalen Computers passt?
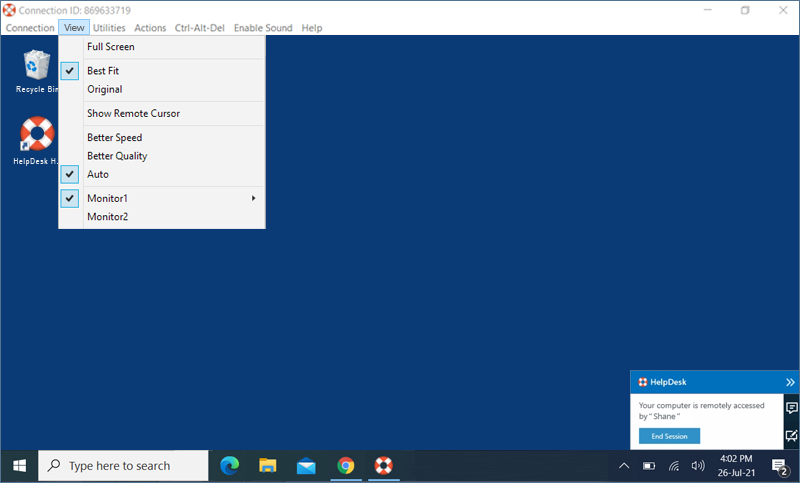
Yes, you can scale the remote computer's desktop screen to fit within your local computer window. By default, the HelpDesk desktop screen auto fits your local computer window but you can scale the desktop screen as per your requirement.
Für Windows:
So skalieren Sie den Desktop des entfernten Computers im Fenster Ihres lokalen Computers,
- Launch the HelpDesk application and log in.
- In the 'Service Queue' tab, click 'Connect' against a Connection ID and establish the connection.
-
Go to the 'View' tab in the menu bar and click 'Best fit'. This will resize the remote computer desktop screen to fit within the local computer window.
Für Mac:
So skalieren Sie den Desktop des entfernten Computers im Fenster Ihres lokalen Computers,
- Launch the HelpDesk application and log in.
- In the 'Service Queue' tab, click 'Connect' against a Connection ID and establish the connection.
- From the application menu, go to 'View' - > 'Scaling'.
-
Click 'Best Fit'. This will resize the remote computer desktop screen to fit within the local computer window.

-
To revert, click 'Scaling' - > 'Original Size'.
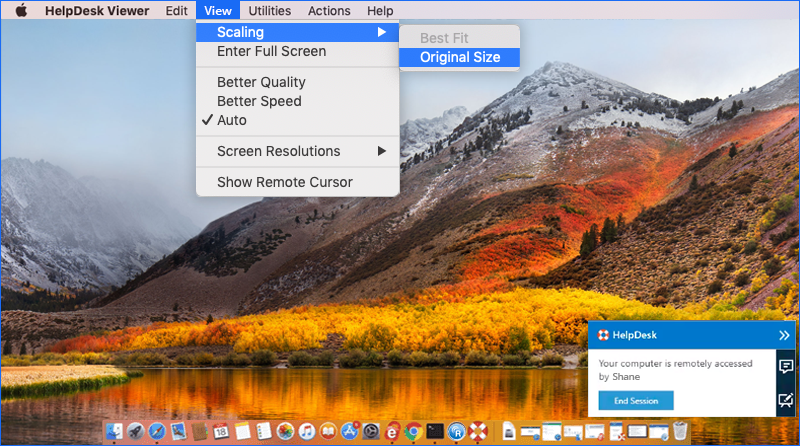
To view the remote computer desktop screen in Full Screen, from the application menu, go to 'View' and select 'Enter Full Screen'.
Yes. If your remote computer has more than one monitor, HelpDesk allows you to switch between multiple screens.
Für Windows,
- Launch the HelpDesk application and log in.
- In the 'Service Queue' tab, click 'Connect' against a Connection ID and establish the connection.
-
Go to the 'View' tab in the menu bar and click Monitor2 to switch between multiple monitors of the remote computer.
Note: You can also change the screen resolutions for individual monitors from here.
Für Mac,
- Launch the HelpDesk application and log in.
- In the 'Service Queue' tab, click 'Connect' against a Connection ID and establish the connection.
-
Klicken Sie auf
 in der oberen rechten Ecke des Bildschirms, um zwischen mehreren Monitoren zu wechseln.
Sie können auch einen einzelnen Monitor des entfernten Computers anzeigen. Gehen Sie im Anwendungsmenü auf "Ansicht" und klicken Sie auf den gewünschten Monitor, um diesen einzeln anzuzeigen. Von hier aus können Sie auch die Bildschirmauflösungen für einzelne Monitore ändern.
If you are remotely accessing a device with multiple monitors, HelpDesk allows you to view multiple remote screens in a single screen at the same time, or view each monitor on a different screen.
-
To view each monitor on a different screen, from the application menu, go to 'View' and click 'All Monitors (Multiple Window)'. Each monitor of the remote computer will appear on a different screen and individual monitors can be accessed by clicking the respective screen.
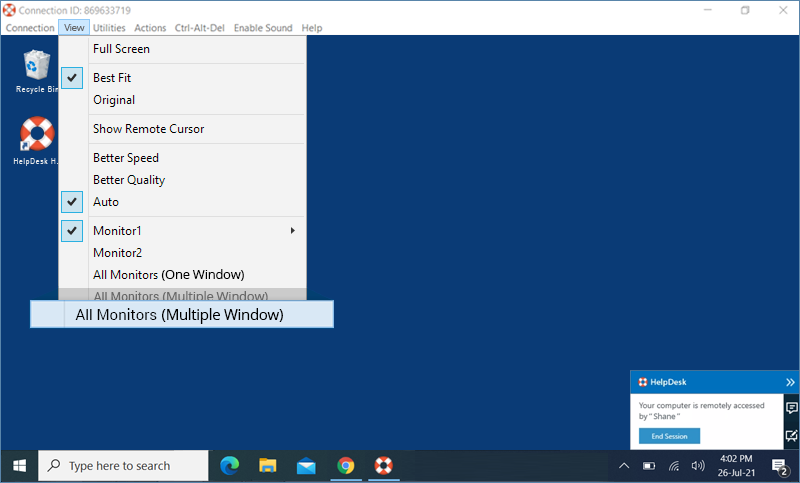
- To view all the monitors on a single screen, from the application menu, go to 'View' and click 'All Monitors (One Window)'. All the screens of the remote computer will appear on the same screen.
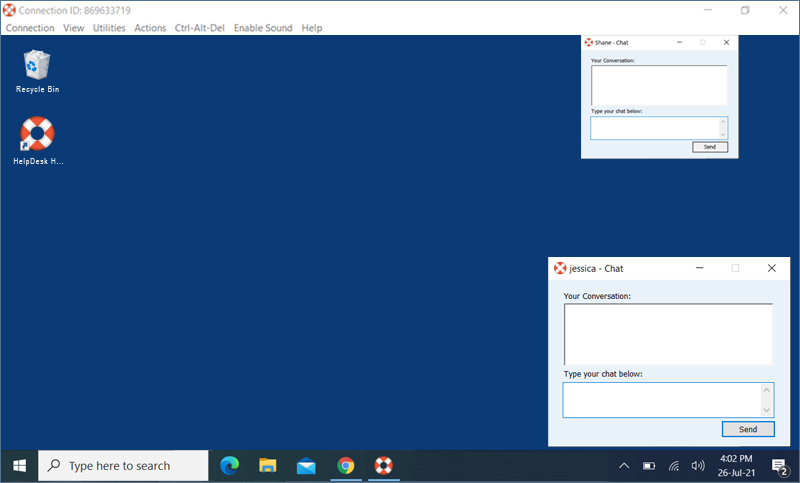
Yes, you can chat with the customer at the remote end during a remote session.
Um einen Chat zu beginnen,
- Launch the HelpDesk application and log in.
- In the 'Service Queue' tab, click 'Connect' against a Connection ID and establish the connection.
- Go to the 'Utilities' tab in the menu bar and click 'Chat' and the screen appears.
-
Enter your message and click on 'Send' to send your message.
Ja, Sie können mit Hilfe der Funktion "Haftnotiz" Notizen auf dem Bildschirm Ihres entfernten Computers machen.
To enable sticky notes,
- Launch the HelpDesk application and log in.
- In the 'Service Queue' tab, click 'Connect' against a Connection ID and establish the connection.
-
Go to the 'Utilities' tab in the menu bar and click 'Sticky Notes' and the screen appears.
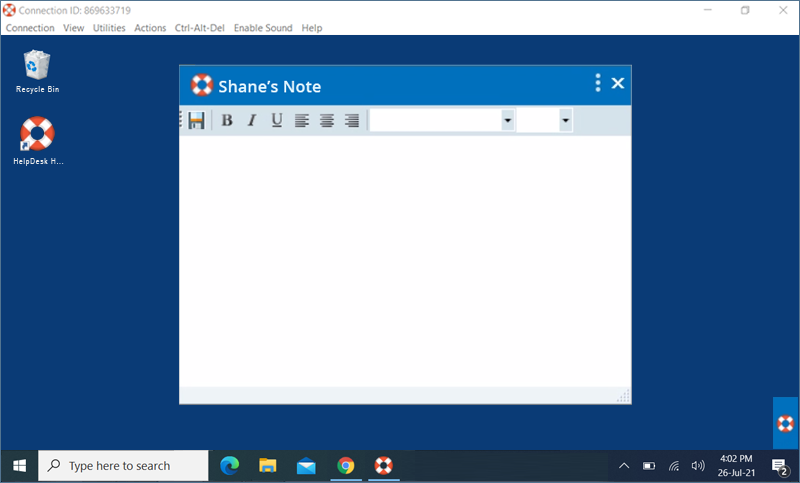
You can save and view the same after the remote session ends, in an offline mode. To save a note on your local computer, click 'Save' on the Sticky Note window.
Mit Whiteboard können Sie während einer Sitzung auf dem entfernten Bildschirm zeichnen, um effektiv zusammenzuarbeiten.
So verwenden Sie Whiteboard,
- Launch the HelpDesk application and log in.
- In the 'Service Queue' tab, click 'Connect' against a Connection ID and establish the connection.
- From the application menu, go to 'Utilities'.
- Klicken Sie auf "Whiteboard". Das Whiteboard-Panel wird auf dem Bildschirm angezeigt.
Sie können zwischen den folgenden Optionen wählen:
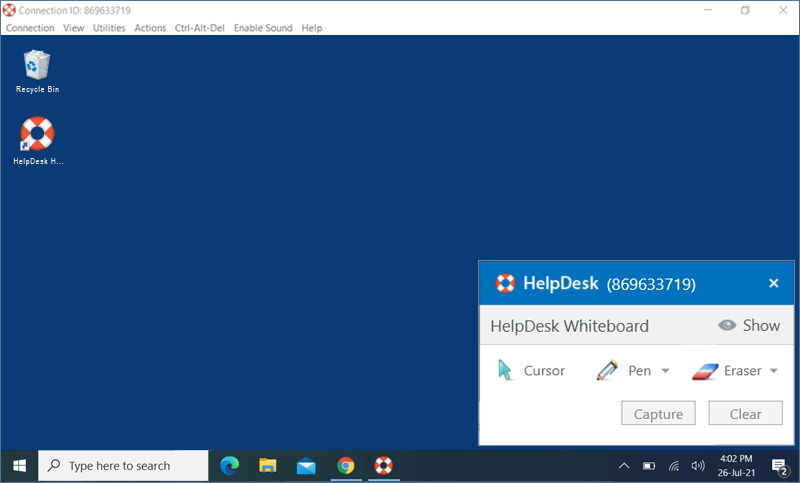
- Cursor: Selected by default, allows you to access the remote computer
- Pen: Select to draw on the remote screen. Choose a line width or color of your preference
- Eraser: Select to clear parts of the drawing on the screen. Choose a suitable width for the eraser
- Capture: Select to capture a screenshot and save it on the local computer
- Clear: Select to clear the entire drawing on the screen
Ja, Sie können auf dem entfernten Computer von Ihrem lokalen Computer aus Musik abspielen und Videos ansehen.
- Launch the HelpDesk application and log in.
- In the 'Service Queue' tab, click 'Connect' against a Connection ID and establish the connection.
-
From the application menu, click 'Enable Sound' to play music or video. To mute audio, click 'Disable Sound'.
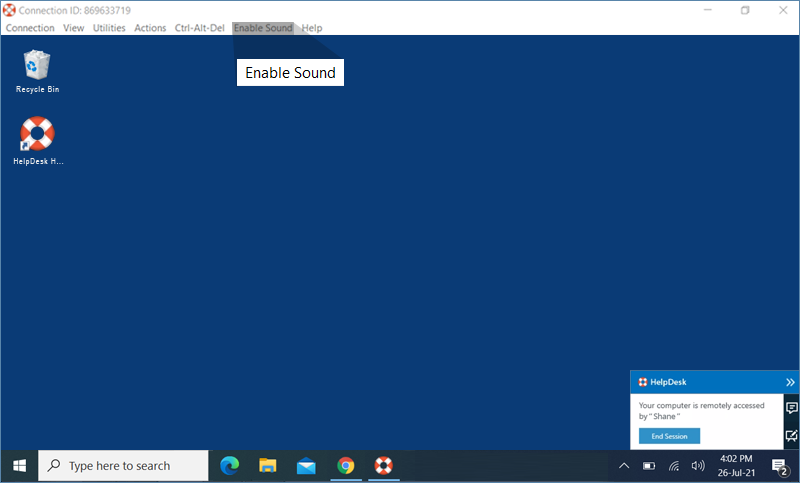
Note: This feature is currently not supported for Mac.
Kann ich während einer Fernsitzung Tastenkombinationen (z. B. Strg + C) auf meinem Ferncomputer verwenden?
Ja, Sie können während einer Fernsitzung Tastenkombinationen (z. B. Strg + C) auf Ihrem Ferncomputer verwenden, indem Sie die Funktion "Tastenkombinationen senden" aktivieren.
Zum Aktivieren,
- Launch the HelpDesk application and log in.
- In the 'Service Queue' tab, click 'Connect' against a Connection ID and establish the connection.
- From the application menu, go to 'Actions'.
-
Click 'Send Key Combinations'.

Ja, Sie können den Computerbildschirm des Partners während einer Fernsitzung sperren.
Zum Sperren,
- Launch the HelpDesk application and log in.
- In the 'Service Queue' tab, click 'Connect' against a Connection ID and establish the connection.
- From the application menu, go to 'Actions'.
- Click 'Lock' - > 'Lock now', to instantly lock the customer computer screen.
-
Click Lock - > 'Lock on session end', to lock the customer computer screen as soon as the remote session ends.
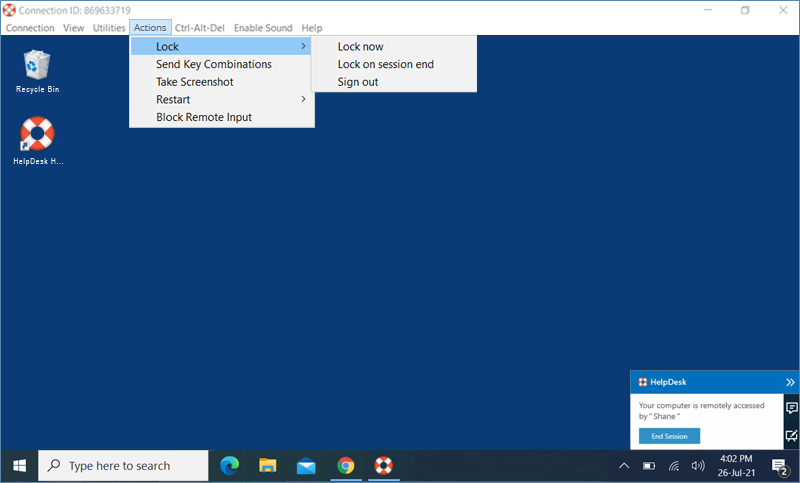
- Click 'Lock' > 'Sign out' to log off the current user profile.
You can also lock the remote computer using the Ctrl+Alt+Del command. When connected to a remote Windows system, the Ctrl+Alt+Del keyboard command will open the screen with Lock, Task Manager, Sign out, and related options.
So senden Sie den Befehl Strg+Alt+Entf,
- Launch the HelpDesk application and log in.
- In the 'Service Queue' tab, click 'Connect' against a Connection ID and establish the connection.
- From the application menu, click 'Ctrl+Alt+Del'.
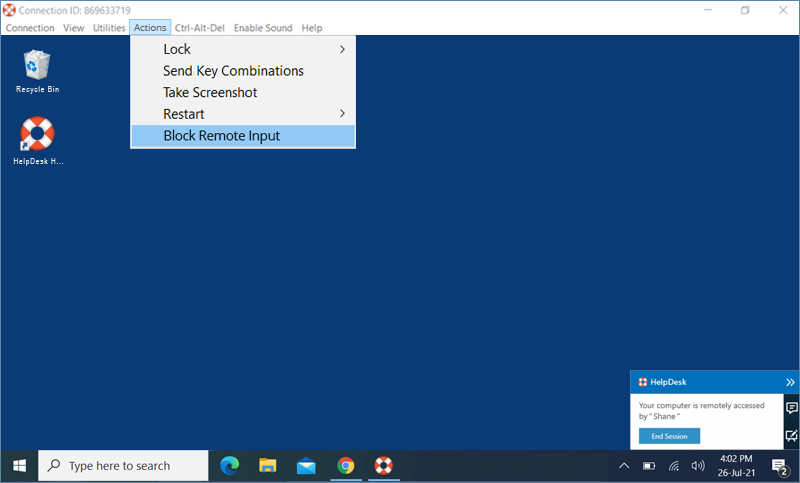
Yes. While accessing a Windows machine, you can prevent users at the remote end from using mouse and keyboard during a session with the 'Block Remote Input' option.
Um die Fernbedienungseingabe zu blockieren,
- Launch the HelpDesk application and log in.
- In the 'Service Queue' tab, click 'Connect' against a Connection ID and establish the connection.
- From the application menu, go to 'Actions'.
-
From the drop-down, click 'Block Remote Input'.
Yes, you can end an ongoing session when your computer is being remotely accessed. When a technician connects to your computer, a message appears on the bottom-right corner of the screen. You can end the session and restrict access to the remote computer by clicking 'End Session'.
Note: Ending a session will also remove the HelpDesk application from your computer.
Ja, Sie können während einer laufenden Sitzung mehrere Dateien/Ordner zwischen Ihrem lokalen und Ihrem entfernten Computer ziehen und ablegen. Wählen Sie die gewünschten Dateien/Ordner auf dem entfernten Computer aus und legen Sie sie an einem bestimmten Ort auf Ihrem lokalen Computer ab oder umgekehrt. Sie können Dateien sicher über mehrere Plattformen hinweg übertragen, z. B. von Windows auf Mac oder umgekehrt.